Difference between revisions of "Beginners"
(→Create a user) |
(→Where am I?) |
||
| Line 63: | Line 63: | ||
===== Access Points ===== | ===== Access Points ===== | ||
| − | ''His gut instincts were legendary. Many a co-pilot questioned his | + | ''His gut instincts were legendary. Many a co-pilot questioned his judgement and his methodology, but the celebrated captain often just struck out on an unknown tangent and found what he was looking for.'' |
Now use the Google Bar on the left hand side of your map view, and Zoom out, so that you see picture covers a bigger area. Once you start seeing other Green Nodes. You can left click on them and a Balloon pop-up should appear. You want to select the Line of Sight (LOS) link. | Now use the Google Bar on the left hand side of your map view, and Zoom out, so that you see picture covers a bigger area. Once you start seeing other Green Nodes. You can left click on them and a Balloon pop-up should appear. You want to select the Line of Sight (LOS) link. | ||
| − | [[Image:Wind hs balloon only.png]] | + | [[Image:Wind hs balloon only.png|frame|left|WiND Main Window]] <br clear="all" /> |
Once you selected the Line of Sight, from now on refered to as '''LOS'''. A new window will pop-up and show you a possible connection. | Once you selected the Line of Sight, from now on refered to as '''LOS'''. A new window will pop-up and show you a possible connection. | ||
| − | |||
| − | |||
As you will notice on this new window that popped-up, the connection will not be successful, not because of the distance, but because of the the ground spike that interferes with the signal. This spike could be a building or a land mark that is between your node and the High Site node that you try to connect. As you can see the elevation was already modified to try and compensate for the unknown land mark in between the two nodes. This was calculated by taking a 2m building hight and a 6m galvanised steel pole. The elevation can be set when you want to edit the Node. Click on Node Edit to modify your node's information. Note that the frequency was set to '''5.8GHz'''. ''Why?'' Because most of CTwug's sites was set on 5.8GHz, reason being a lot less noise and ideal for when you have clear LOS. | As you will notice on this new window that popped-up, the connection will not be successful, not because of the distance, but because of the the ground spike that interferes with the signal. This spike could be a building or a land mark that is between your node and the High Site node that you try to connect. As you can see the elevation was already modified to try and compensate for the unknown land mark in between the two nodes. This was calculated by taking a 2m building hight and a 6m galvanised steel pole. The elevation can be set when you want to edit the Node. Click on Node Edit to modify your node's information. Note that the frequency was set to '''5.8GHz'''. ''Why?'' Because most of CTwug's sites was set on 5.8GHz, reason being a lot less noise and ideal for when you have clear LOS. | ||
| − | + | [[Image:Wind los window bad.png|frame|left| Pop Up Window: Bad Connection]] <br clear="all" /> | |
| − | [[Image:Wind los window | ||
Again the distance not being the problem. Now we need to determine if that High Site's Sector is even pointing at you. Go back to your map view and enable the 5.8Ghz Legend. If the Sector is not pointing in your direction you need to look at another High Site that is pointing in your direction. | Again the distance not being the problem. Now we need to determine if that High Site's Sector is even pointing at you. Go back to your map view and enable the 5.8Ghz Legend. If the Sector is not pointing in your direction you need to look at another High Site that is pointing in your direction. | ||
| + | [[Image:Wind los window retry good.png|frame|left|Pop Up Window: Good Connection]] <br clear="all" /> | ||
=== Wireless Hardware === | === Wireless Hardware === | ||
''In reality, Max relied on instinct and an understanding of the Atlantic Ocean. Once the grid was covered, he put his mind to work.'' | ''In reality, Max relied on instinct and an understanding of the Atlantic Ocean. Once the grid was covered, he put his mind to work.'' | ||
| − | You can be a broadcaster, client, or a client that later becomes a broadcaster. The CTWug community prefers to use [http://www.routerboard.com/comparison.html Mikrotik RouterBoards]. ''Why?'' I hear you ask, well most of the Wuggers feels comfortable in setting up these devices. If you decide to buy something else, which you are | + | You can be a broadcaster, client, or a client that later becomes a broadcaster. The CTWug community prefers to use [http://www.routerboard.com/comparison.html Mikrotik RouterBoards]. ''Why?'' I hear you ask, well most of the Wuggers feels comfortable in setting up these devices. If you decide to buy something else, which you are entitled to. Just make sure that you do have the knowledge or someone close by that knows how to operate your device. |
| + | |||
| + | ===== Concepts ===== | ||
| + | We already know from the legends that we get High Sites. Those nodes are marked in Green. Then we see a node that is Blue, which is just a client. In the next section we will try to explain how to start as a client node which will allow your equipment to be transformed later into a High Site. ''Now why would I want to do that, huh?'' That answer is easy. This is the way the Wug Network '''expands'''. Becoming a broadcaster your self, ensures that the network grows so that other potential users could later join. Similar to a [http://en.wikipedia.org/wiki/Network_topology#Daisy_chains Daisy Chain] network. The Wug strives to become a [http://en.wikipedia.org/wiki/Network_topology#Decentralization decentralized type network]. The more wireless links we add the more alternative network paths we add, this is of course good for redundancy and we like that a lot! | ||
| + | |||
| + | ===== Hardware Puzzles ===== | ||
| + | From now on we will refer the Router Board as a '''RB''' device. After staring for too long on the comparison product page of Mikrotik, you will begin to notice that there are boards with a [http://en.wikipedia.org/wiki/Peripheral_Component_Interconnect#Mini_PCI mini pci slot]. ''Oh, so why are we interested in those?'' We need a RB with a mini PCI slot to add a radio card. | ||
| + | [[Image:RB 411 small.jpg|frame|left|RB 411]][[Image:RB 433 small.jpg|frame|none|RB 433]] | ||
| + | |||
| + | ''Radio card?'' Yes we can also refer to them as wireless cards. ''Aren't they the same as the wireless cards for PCs?'' Yes and no. Your regular PC don't have mini-PCI slots. | ||
| − | |||
| − | |||
| − | + | ===== Preferences ===== | |
Revision as of 16:08, 31 March 2009
Contents
Beginners Guide
This page assumes that you have some computer literacy skills, may it be Windows or even Linux. Here you will find a beginners guide on how to get involved in the Cape Town Wireless User Group.
CTWug
"There Be Treasure to Plunder, Matey..."
So you heard about the CTWUG, but what exactly is it? The CTWug is a stand alone entity. It consists out of members of the public that contributes money, time and effort with wireless hardware to build a giant network that is independent of any commercial telecommunication companies.
Where am I?
"That's the last grid, capt'n," Ted said quietly. "Sorry we didn't find the boat." Max banked the Guardian to the right. "Uh, capt'n. The base is the other way."
So how do you know what to buy and where to get connected? Firstly we need to know where you are so that we can determine what kind of hardware to get. The CTWug uses a web server called WiND. Get your self plotted on http://wind.ctwug.za.net/wind.
Create a user
"They've found me," he whispered. He jumped up and danced on the shoreline. "They found me!" he screamed as the jet flew overhead again, wagging its wings to let him know he'd been seen. Hunter was ecstatic and he danced a dance of elation on the shores of Brice's island.
So you got the web page, now what? Go to the upper left hand corner and click on Register. Fill in at least a username, password and a valid e-mail address. We might want to contact you later. Go to your e-mail interface and follow the instructions. After you logged in successfully you can proceed to create a node.
Nodes
Hunter grabbed a flashlight and opened the port lazarette. The yellow beam of light cut through the darkness and illuminated the fuel gauge. The needle hovered around the half mark.
Create a Node
![]() Lets create a node, click on the bottom left corner you will see a My node with a link that says Add Node. Click on the Add Node link. The page should now change on the right hand side.
Lets create a node, click on the bottom left corner you will see a My node with a link that says Add Node. Click on the Add Node link. The page should now change on the right hand side.
Find Coordinates
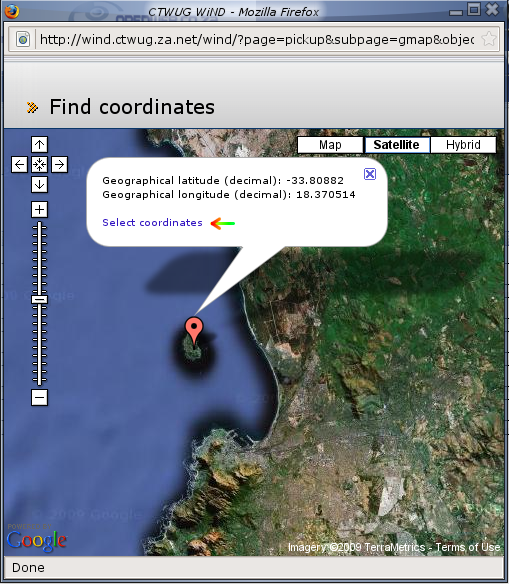
 To get coordinates, the WiND server has provided you with a little help window. When you click on the Find Coordinates link, it will open up a new window. Scroll around using the mouse, by pressing the left mouse button and while pressed, drag the image aera and you will see the area changes. When you release the left mouse button the map should update. On the left hand side you will notice a bar. This bar is used to zoom in or out.
Once you have located your area, you double click the left mouse button in the Find Coordinates Window and a red node balloon will appear, with the decimal values that your Add Node Page requires.
Map View
Now save the node page by clicking at the bottom of the page OK and continue. If the page refreshed, a new link became visible after you saved the node page. At the top right right hand corner should a link appear that goes to a map view of your node. Follow this link to determine what other nodes are close to you.
Legends
When you followed the View Node link, a map similar to the Find Coordinates should appear, the difference is that your node is now selected and appears Grey. At the bottom of the map you will see options:
| Legend | Colour | Definition |
|---|---|---|
| BackBone Node | Yellow | Where CTWug started. |
| Backbone Links | Green | This is a high speed link between to High Sites. |
| Access Points | Green | High Site, They act as a client and broadcaster. |
| Clients | Blue | Clients connected to High Site |
| Not Linked | Red | Potential High Site or a Client |
| 2.4GHz | Yellow | This enables the view of a Wireless Sector Antenna. The broadcasting range is the 2.4GHz in the ISM Band |
| 5.8GHz | Red | This enables the view of a Wireless Sector Antenna. The broadcasting range is the 5.8GHz in the ISM Band |
Enable the Not linked node view as displayed above. Why? You ask? So that you can see if there are any other users in the area that also want to connect. Now why do I want see that? Lets say that there are no High Sites available in your area, you can contact your closest not linked Wugger and arrange a meeting to see if you can build a High Site close to your own area.
Access Points
His gut instincts were legendary. Many a co-pilot questioned his judgement and his methodology, but the celebrated captain often just struck out on an unknown tangent and found what he was looking for.
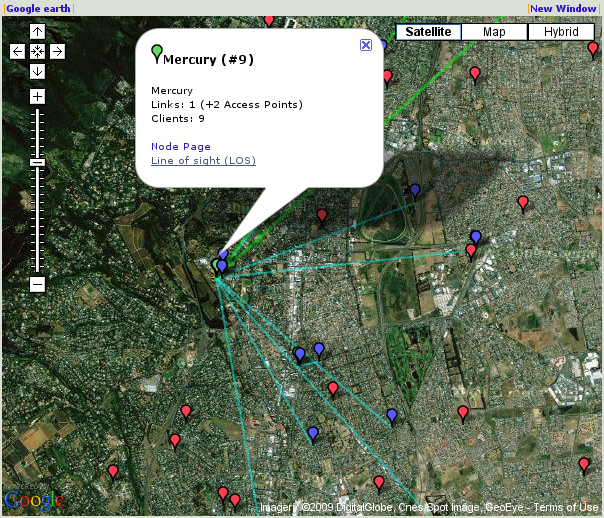
Now use the Google Bar on the left hand side of your map view, and Zoom out, so that you see picture covers a bigger area. Once you start seeing other Green Nodes. You can left click on them and a Balloon pop-up should appear. You want to select the Line of Sight (LOS) link.
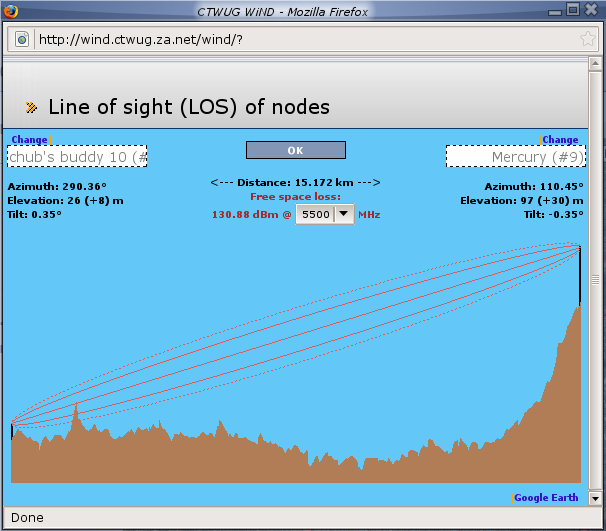
Once you selected the Line of Sight, from now on refered to as LOS. A new window will pop-up and show you a possible connection.
As you will notice on this new window that popped-up, the connection will not be successful, not because of the distance, but because of the the ground spike that interferes with the signal. This spike could be a building or a land mark that is between your node and the High Site node that you try to connect. As you can see the elevation was already modified to try and compensate for the unknown land mark in between the two nodes. This was calculated by taking a 2m building hight and a 6m galvanised steel pole. The elevation can be set when you want to edit the Node. Click on Node Edit to modify your node's information. Note that the frequency was set to 5.8GHz. Why? Because most of CTwug's sites was set on 5.8GHz, reason being a lot less noise and ideal for when you have clear LOS.
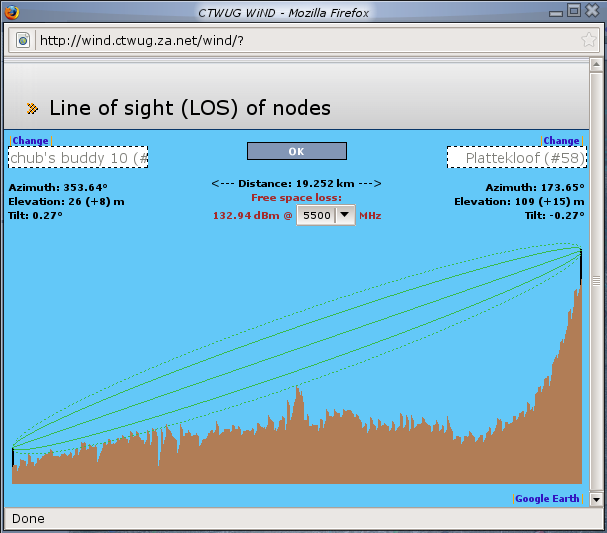
Again the distance not being the problem. Now we need to determine if that High Site's Sector is even pointing at you. Go back to your map view and enable the 5.8Ghz Legend. If the Sector is not pointing in your direction you need to look at another High Site that is pointing in your direction.
Wireless Hardware
In reality, Max relied on instinct and an understanding of the Atlantic Ocean. Once the grid was covered, he put his mind to work.
You can be a broadcaster, client, or a client that later becomes a broadcaster. The CTWug community prefers to use Mikrotik RouterBoards. Why? I hear you ask, well most of the Wuggers feels comfortable in setting up these devices. If you decide to buy something else, which you are entitled to. Just make sure that you do have the knowledge or someone close by that knows how to operate your device.
Concepts
We already know from the legends that we get High Sites. Those nodes are marked in Green. Then we see a node that is Blue, which is just a client. In the next section we will try to explain how to start as a client node which will allow your equipment to be transformed later into a High Site. Now why would I want to do that, huh? That answer is easy. This is the way the Wug Network expands. Becoming a broadcaster your self, ensures that the network grows so that other potential users could later join. Similar to a Daisy Chain network. The Wug strives to become a decentralized type network. The more wireless links we add the more alternative network paths we add, this is of course good for redundancy and we like that a lot!
Hardware Puzzles
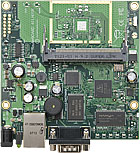
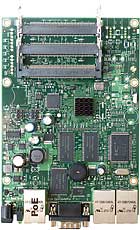
From now on we will refer the Router Board as a RB device. After staring for too long on the comparison product page of Mikrotik, you will begin to notice that there are boards with a mini pci slot. Oh, so why are we interested in those? We need a RB with a mini PCI slot to add a radio card.
Radio card? Yes we can also refer to them as wireless cards. Aren't they the same as the wireless cards for PCs? Yes and no. Your regular PC don't have mini-PCI slots.

