Difference between revisions of "Advanced DC++"
From CTWUG Wiki
| Line 1: | Line 1: | ||
| − | Your natted and your pc | + | Your natted and your pc does not have a “wug ip” but a private 192.xxx.xxx.xxx or 10.xxx.xxx.xxx ip |
For you to be an active user, you would need to open ports in your rb’s firewall to allow DC to connect via certain ports. | For you to be an active user, you would need to open ports in your rb’s firewall to allow DC to connect via certain ports. | ||
#Firstly log into your rb via winbox and go IP > Firewall and choose the NAT Tab | #Firstly log into your rb via winbox and go IP > Firewall and choose the NAT Tab | ||
Latest revision as of 22:08, 17 March 2016
Your natted and your pc does not have a “wug ip” but a private 192.xxx.xxx.xxx or 10.xxx.xxx.xxx ip For you to be an active user, you would need to open ports in your rb’s firewall to allow DC to connect via certain ports.
- Firstly log into your rb via winbox and go IP > Firewall and choose the NAT Tab
- Click on the red + to add a new nat rule
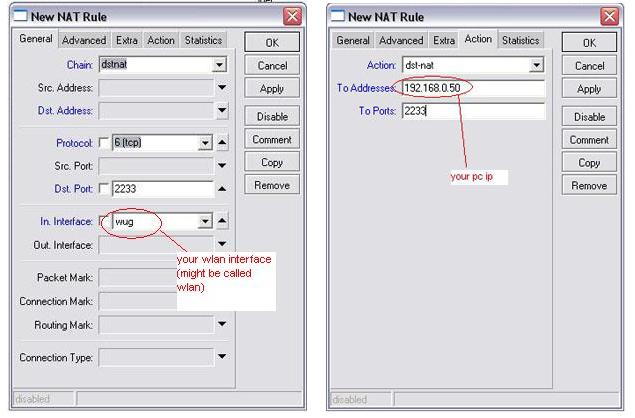
- Looking at Fig 2 , under the General tab, choose “dstnat”
- Under Protocol choose 6 (tcp) (you could leave this step out)
- Under Dst port choose port 2222 (You will notice that WugDC is preconfigured to only run on port 2222)
- Under the In Interface choose your wlan adapter that connects you to your wug highsite. In fig2 its called wug, but you might have named differently
- Go to the Action tab, now reference fig3
- Under Action choose dstnat
- At the ToAddress, TYPE THE IP OF YOUR PC
- At the to ports, type 2222
- Click on apply and open your WugDC Client
- In the “External/WAN IP” box, TYPE THE 172.18.xxx.xxx IP OF YOU RB.
- Tick the “Don’t allow hub/Upnp to override” box
- Click on ok and connect to your hub as an active user.
