Difference between revisions of "Wind Coverage"
(New page: Wind Coverage ==Intro== You can use this guide to add a coverage overlay to wind for your access points. ==Draw Polygon== Using Google Earth, draw a polygon of roughly where you think y...) |
|||
| Line 8: | Line 8: | ||
Using Google Earth, draw a polygon of roughly where you think your access point covers. You do not have to give it any special name or change the colors or anything, all you want is the polygon. | Using Google Earth, draw a polygon of roughly where you think your access point covers. You do not have to give it any special name or change the colors or anything, all you want is the polygon. | ||
| − | [[Image:Coverage_1_Draw.jpg| | + | [[Image:Coverage_1_Draw.jpg|600px|left|Use Google Earth to draw your coverage polygon]] <br clear="all" /> |
==Copy Polygon== | ==Copy Polygon== | ||
| Line 14: | Line 14: | ||
Now right click on the polygon in the "Places" menu on the left hand side, and copy it. | Now right click on the polygon in the "Places" menu on the left hand side, and copy it. | ||
| − | [[Image:Coverage_2_Copy_Polygon.jpg| | + | [[Image:Coverage_2_Copy_Polygon.jpg|600px|left|Copy that polygon in Google Earth]] <br clear="all" /> |
==Copy Coverage== | ==Copy Coverage== | ||
| Line 22: | Line 22: | ||
Search for <coordinates> to and copy all the text after that, and before </coordinates> (Do not copy the <coordinates> and </coordinates> parts, you only want the list of numbers) | Search for <coordinates> to and copy all the text after that, and before </coordinates> (Do not copy the <coordinates> and </coordinates> parts, you only want the list of numbers) | ||
| − | [[Image:Coverage_3_Copy_Coverage.jpg| | + | [[Image:Coverage_3_Copy_Coverage.jpg|600px|left|Paste into text editor and copy the coordinates]] <br clear="all" /> |
==Paste Coverage== | ==Paste Coverage== | ||
| Line 28: | Line 28: | ||
In wind, edit the link that represents your access point, and paste those coordinates into the Coverage: box. | In wind, edit the link that represents your access point, and paste those coordinates into the Coverage: box. | ||
| − | [[Image:Coverage_4_Paste_Coverage.jpg| | + | [[Image:Coverage_4_Paste_Coverage.jpg|600px|left|Edit the link in Wind and paste the coordinates]] <br clear="all" /> |
Save and test to see if your coverage shows up on wind. To see the coverage, check the 2.4ghz and/or the 5.8ghz checkboxes underneath the map. | Save and test to see if your coverage shows up on wind. To see the coverage, check the 2.4ghz and/or the 5.8ghz checkboxes underneath the map. | ||
Revision as of 09:31, 16 September 2009
Wind Coverage
Intro
You can use this guide to add a coverage overlay to wind for your access points.
Draw Polygon
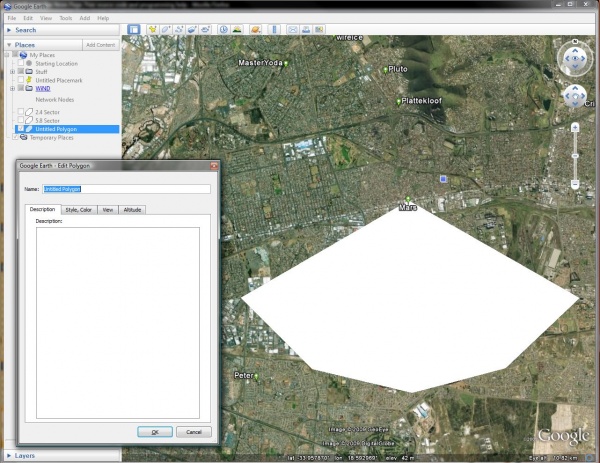
Using Google Earth, draw a polygon of roughly where you think your access point covers. You do not have to give it any special name or change the colors or anything, all you want is the polygon.
Copy Polygon
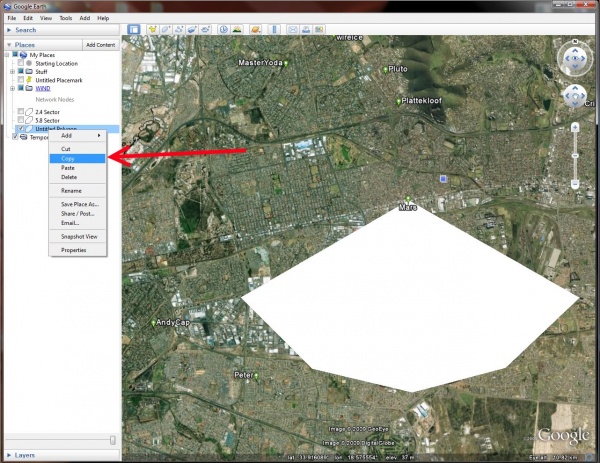
Now right click on the polygon in the "Places" menu on the left hand side, and copy it.
Copy Coverage
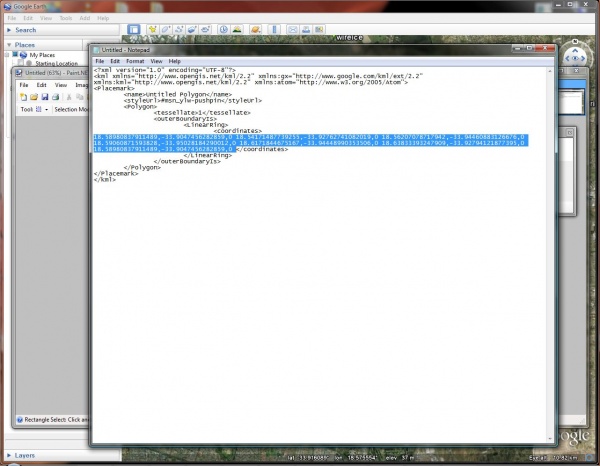
Open notepad (or any other text editor you prefer) and Paste. The polygon details should appear.
Search for <coordinates> to and copy all the text after that, and before </coordinates> (Do not copy the <coordinates> and </coordinates> parts, you only want the list of numbers)
Paste Coverage
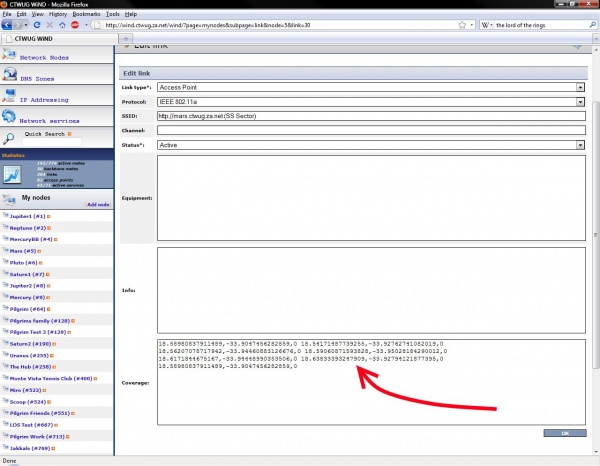
In wind, edit the link that represents your access point, and paste those coordinates into the Coverage: box.
Save and test to see if your coverage shows up on wind. To see the coverage, check the 2.4ghz and/or the 5.8ghz checkboxes underneath the map.


