Getting Connected
This part of the guide is due for an update. - Beetle001
Now that you've plotted your node, had a chat to some people around you that are connected, had a chat to us on IRC and had a look at your connectivity options, let's have a look at some of the hardware considerations and how to actually GET CONNECTED.
This is PART TWO of a THREE PART guide. Go Start_Here to see the guide index.
Contents
Introduction
You'll remember in the previous part of the guide when we discussed the different types of links - point to point and sector connections. In truth, only a lucky few get the opportunity to just buy a client kit, aim at a sector and connect. In reality, this is very often not possible and a point to point link must be made. This is the biggest challenge many new users face - how to go about determining who to connect to and what to buy to connect.
Let's have a look at the different types of kit and what it all means.
(Note: This guide is written with Mikrotik hardware as it is by far the most prevalent equipment used. It may not apply to your area - specifically if you are in the DeepSouth or Southpen areas there may be other connection options or requirements).
Types of Nodes
When you connect to CTWUG, you can be one of 3 different types of node.
Sector Client or Point to Point Client
Both the sector client and the point to point client are a dead-end link. They get a connection from the network, but they don't broadcast on.
Relay Node / Backbone Node
A relay node has more than one point to point link where the other side of the point to point links also have multiple point to point links - so over and above their own traffic, they pass traffic through it to other parts of the network, creating a 'relay' and aiding with the backbone of the network.
Sector Node
A sector node has one or multiple point to point links as well as a sector to allow sector clients to connect to it. This node type could also have multiple dead end point to point links to provide access to CTWUG.
Some nodes start off as sector or point to point clients and add links on to their node to become relays or sector nodes while others stay as only clients. If you are interested in becoming a relay node or a sector node, we recommend you start off with a point-to-point link.
Buying Equipment
It is VERY IMPORTANT that before you purchase any equipment you are 100% sure where you are linking, you have got the relevate permissions/go ahead/agreement with the person, node or sector you are linking to, verified you have the correct line of sight and height for a connection and they have advised you on exactly what you need to buy.
DO NOT PURCHASE ANY EQUIPMENT WITHOUT KNOWING EXACTLY WHAT YOU ARE BUYING AND FOR WHAT.
If you are at all unsure:
- Come visit us on CTWUG_IRC to discuss your scenario and get advice.
- Check, double check and check again with the node owner or admin in your area to ensure you are going to buy the right equipment.
Under no circumstances will CTWUG be liable if you purchase equimpent you can't use or that is incorrect for your use. It is solely your responsibity to be 100% sure before buying anything.
Once we are sure you are able to connect and what equipment you should get, you need to buy it. We have agreements in place with a number of vendors.
- Scoop Distribution - CTWUG ACCOUNT NO: CTW001
- Miro - CTWUG ACCOUNT NO: CCTW001
- Uniterm - CTWUG ACCOUNT NO: CAP006
When buying the equipment provide the vendor with your CTWUG WiND node name for reference.
NOTE: Please do not use these accounts for private or business use - they are for the purchase of kit used to connect to CTWUG and the CTWUG network only. CTWUG enjoys rebate deals with these vendors that fund much of the CTWUG owned network infrastructure.
Wireless Hardware
Now let's have a look at the different types of wireless hardware and what each is used for.
The Routerboard
(From now on we will refer the Routerboard as an RB).
At the very heart of the Mikrotik wireless kit, we find the RB. This is the router itself. Essentially, its a tiny MIPS powered computer that's sole function is to control the flow of network traffic. RBs come in many different shapes, sizes and uses. Which one you'll need depends a lot on what you're going to be doing with it. Some have only one built-in wireless interface, some have multiple mini pci slots while others don't have any wireless intefaces but are used for routing wired network traffic.
Let's have a look at a couple of the most common.
RB411

It is used as an interface for connecting and routing one wireless link to a wired network. They can be used for either a point to point link or a sector.
Full specs:
http://routerboard.com/RB411
RB433/RB433L/433AH/433GL

It can be used to create point to point links or as sector interfaces - up to 3 interfaces per RB in any combination you need.
Full specs:
RB433: http://routerboard.com/RB433
RB433L: http://routerboard.com/RB433L
RB433AH: http://routerboard.com/RB433AH
RB433GL: http://routerboard.com/RB433GL
RB911G/RB912G

The 911G doesn't have any miniPCI slots, so they are only able to have one interface. The RB912G does have an additional miniPCI slot, so you can optionally add a radio card to have two intefaces. The RB911 and RB912 can be used for either a point to point link or a sector (or even one of each in the case of an RB912). The RB912G is available in an outdoor version that has an enclosure and is ready for immediate outdoor use.
Full Specs:
RB911G:http://routerboard.com/RB911G-5HPnD
RB912G: http://routerboard.com/RB912UAG-5HPnD
RB912G Outdoor: http://routerboard.com/RB912UAG-5HPnD-OUT
RB750/RB750GL

They're used on CTWUG for those who have more than one RB to connect them together and route or switch between them.
Full Specs:
RB750: http://routerboard.com/RB750
RB750GL: http://routerboard.com/RB750GL
RB2011L/RB2011L-IN

They're used on CTWUG for those who have more than one RB to connect them together and route or switch between them. There is a barebone PCB version (RB2011L) and an indoor version in a case (RB2011L-IN), rackmount (RB-2011IRM), an indoor version with a built in home 2.4GHz AP (RB-20112HND) as well as some other minor modified versions (like with SFP and LCD, etc).
Full Specs:
RB2011L: http://routerboard.com/RB2011L
RB2011L-IN: http://routerboard.com/RB2011L-IN
RB2011IL-RM: http://routerboard.com/RB2011iL-RM
RB-2011UAS-2HnD-IN: http://routerboard.com/RB2011UAS-2HnD-IN
Radio Cards
To transmit or receive a signal, and to convert that signal to a network-readable data stream, we need a wireless radio card.
2.4GHz vs 5.8GHz
Many new users ask us what the difference is between these two frequencies and why we use almost exclusively 5.8GHz equipment.
Although it may seem obvious, there are several things you should note about these two frequencies.
- You can't connect a 5.8GHz device to a 2.4GHz device and vice versa.
- 5.8GHz devices need a much cleaner direct line of sight over 2.4GHz devices.
- There is more interference on 2.4GHz band as a huge number of devices use it.
- There aren't really any 'speed' differences between 2.4 and 5.8ghz (bearing in mind interference may cause speed issues).
- 5.8GHz is preferred as it is a 'cleaner' spectrum.
Types of Radio Cards
Pigtails and Enclosures
Wireless Antennas
The wireless antenna is what we use to transmit or receive the signal from our RB's radio out to the other side of the wireless link.
Recommended Kits
A Note about SXTs and Sextants =
Sector Client and Point to Point Kit
Relay Node Kit
Sector Host Kit
Installing your kit
Before you just stick a ladder up the wall and jump on the roof; have a think about where you would like to attach your equipment and how you need to route cables back into your house. Often sitting down and working out the distances and logistics will reveal things you had not thought about. Running the cable under the eve of the roof might sound like a simple plan, but does the slope of your roof allow you easy access to be able to route the from the inside out? Drilling through an outside wall might also take a bit more work than you think and how sure are you where the water pipes and electricity conduits travel?
Some items that might make your installation simpler
- Some good friends. Having an extra hand really helps a lot. Throw some beers in the fridge and make sure the SO keeps the snack topped up.
- A sturdy ladder
- A good drill with the correct bits. Hammer action helps. You need a masonry bit. Speak to your hardware store man.
- Marker to plot your drill points
- Hammer to knock the plugs into the wall for the bracket
- Monkey wrench, spanner or even better: a socket set. There are a few bolts to be tightened when you mount the bracket, pole and equipment.
- Cable ties to tidy things up after you install
- The obligatory side cutter when you realise you need to cut cables you tied prematurely
- Crimping tool if you intend to make your own cables on the day (try test your cable before running it to the roof)
- Another nice to have is fish tape [1]. It really makes routing cables through tight places much easier.
- Two way radios. Saves you having to drag your notebook up onto the roof. A headset with a cellphone works just a well. Besides you get to say things like: "Two more degrees to the right, over".
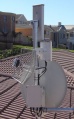
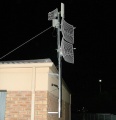
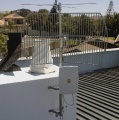
Bracket and Masts
Brackets and masts come in various shapes and sizes and are made from different types of metal. The height of your mast will very much dictate the type of mast and bracket you will install.
A 38mm aluminium 2m mast can generally be installed with an economy bracket. The 50mm galvanised steel masts are more sturdy (i.e. less movement in the wind) and range from 2 - 6m. These will require a more serious bracket like a Tripod wall mount. L-Mounts are generally used for things like satellite dishes where there is very little tolerance for motion. Along with your mast and bracket you will need to purchase a U Bolt(s) to secure the mast to the bracket as well as bolts to attach the bracket to the wall. The supplier of the bracket and mast should be able to guide you as to which sizes you need. If your mast is very long or top heavy you can attach tie downs to prevent it from toppling over in high wind.
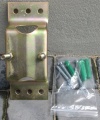
Economy Bracket with Bolts
Economy Bracket
L-Mount
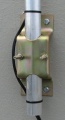
Tripod Wall Mount with Ties
Tripod Wall Mount


Waterproof your connectors
For continued stability and quality of your wireless link, you need to waterproof the connectors of your antenna installation.
Check the guide on how to waterproof your connectors.
Getting connected
- Once you have set up your kit on your roof its time to do a scan for the ctwug ssids.
- With the help of WIND you should have a good idea of where possible CTWUG highsites are.
- Your antenna scans in the direction that the antenna feed points to (if you are using a grid). Flat Panel antennas scans in the direction that the front flat area points to.
- Download winbox [2]
- Log into winbox and on the menu on the left click Wireless. A new window pops up. Double click your wireless interface (probably called wlan1 if you havent renamed it). Another window pops up. Click on the Scan button to begin your scan. Keep on scanning until you find the ctwug site that you want to connect to.

- You want to align your antenna to get the best signal. Click on the Connect button. The relevant's highsite details will be applied to your wlan interface. Click Close to close the scan window. Give it a couple of seconds. You will see in the bottom right of the interface window the text saying "connected to ess" That means your router has connected to the highsite. If it reads "searching for networks" you have not successfully connected to the highsite. If you have not yet given your wlan adapter's mac address to a highsite admin then you wont be seeing the "connected to ess"
- There are Minimum Requirements to join a CTWUG High Site:
- Signal less than -78dBm
- CCQ greater than 60%/60%

- Now is a good time to log onto IRC and ask an admin responsibile for that highsite to enable your mac and issue you with an ip range.
Configure your IP Address
- If you are unsure of how to add the IP addresses given to you by you HS Admin, please read the PTP Link Page under the Howto's section of the wiki.
- It is very important to register all the ip's you use on your node page on WiND. This is so that DNS hostnames are generated for your IP's. It is required. More on how to do this here: DNS Setup
Quality network Link
- Before running off, read the CTWUG_CCQ page to align your antenna for the best possible performance. Remember bad signal and bad CCQ not only gives you a bad WUG experience, it also affects other users connected to the same interface on the highsite as your are.