Setup PPTP for Internet Sharing
Contents
Description
This tutorial will help you setup a simple PPTP for both server and client side in order to share a single internet connection either between friends or between yourself and your office ( should the office be wug linked as well )
Server Side
Enabling Server
Settings for the server will be as follows. Please ensure that the RB running the server also has an active Internet Connection, either through additional routes or through PPPoE ( See PPPoE Internet )
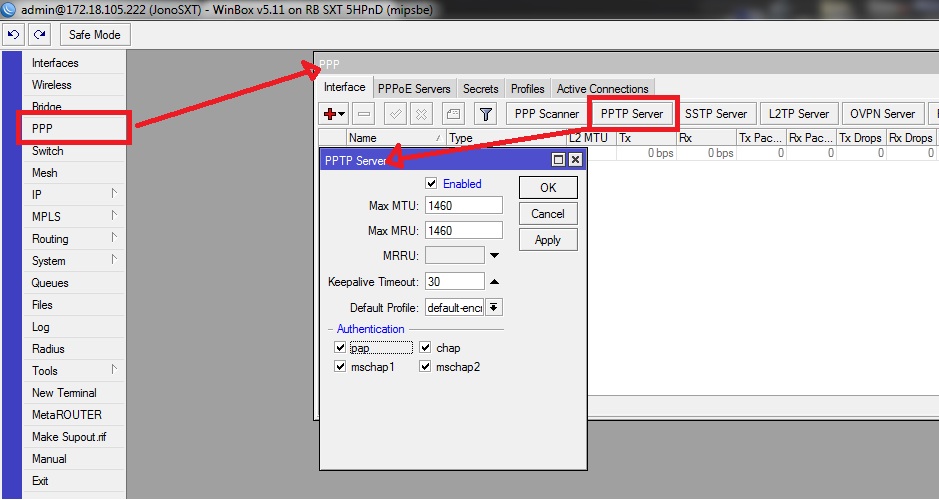
- Click on "PPP" which will open the box shown by the arrow.
- Click on "PPTP" Server. The box shown will open.
- Check the "Enabled" box and all authentication box's at the bottom.
- Click "Apply" and then "OK"
Adding Users
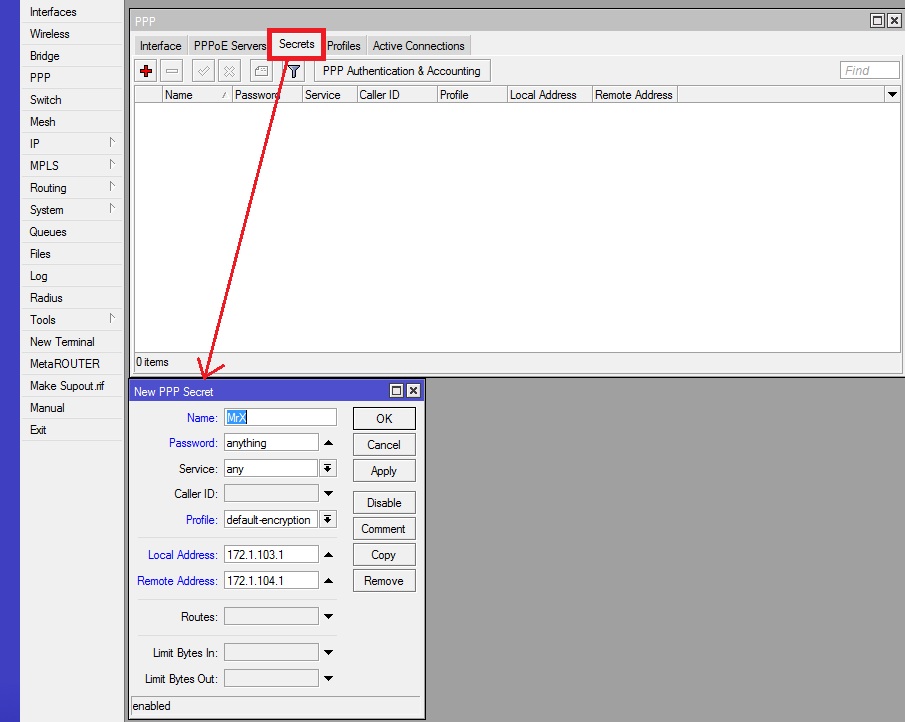
- In the "PPP" Screen, Select the "Secrets" tab. A "New PPP Secret" Box will pop up.
- Name: The username for the person connecting to your server.
- Password: Password for this account.
- Profile: default-encryption
- Local Address: 172.1.103.1 ( You can theoretically make it any ip address but for this example and for all the setups I have done, this is the exact method I did )
- Remote Address: 172.1.104.1. When complete click apply, then OK and this new user will be saved onto your RB ready for connecting from a remote source.
To add more users, follow the same procedure as above noting the "Local Address" must always be constant ( i.e. 172.1.103.1 ) for all accounts and the remote address will increase in increments of one for every user ( i.e. Next users address will be 172.1.104.2 )
Additionally the reason for the weird IP address is that it does not conflict with any known CTWUG or default IP's.
NAT new remote IP's
See Nat Tutorial under Masquerade to allow new users to NAT through your Inet Connection.
Additionally do not confused with any other NAT's, under Src-Address, enter the IP range of your remote hosts, whoever many there may be. Ex. 172.1.104.1-172.1.104.254 and ensure that Out-Interface is the interface your internet runs on.
Client Side
Tutorial is currently under work... Please be patient

